
iPhone Jailbreak and Upgrade to 1.1.2
Today, I decided to jailbreak my iPhone and start adding third party apps. Hopefully, I’ll be adding my own apps soon. I tried to document the whole experience below. I am using a Mac, but the same steps apply to Windows users as well. Also note that I’m using an activated phone.
My iPhone was still at version 1.1.1, I had postponed upgrading to 1.1.2 in anticipation of this jailbreak. If you’re already at version 1.1.2 (whether you upgraded or your iPhone came with it doesn’t matter), there’s a solution where basically you’ll first downgrade to 1.1.1, perform the jailbreak, and then upgrade back to 1.1.2 again. The jailbreak app that you need to download from Conceited Software’s website contains a readme.txt file that explains how to do this downgrade operation.
First thing I did was to launch Safari on my iPhone in order to visit http://jailbreakme.com. There, at the bottom of the page there is a link to “Install AppSnapp”. That link uses the “tiff exploit” to crash Safari and execute jailbreak code. After safari crashed, I was returned to Springboard and the Intaller.app was installed.
I launched Installer.app and selected to install OktoPrep from Tweaks (1.1.1) section. This prepares your jailbroken iPhone for the 1.1.2 upgrade so that it will still be jailbroken after the upgrade. If you upgrade your phone without first installing OktoPrep, you’ll have to downgrade to 1.1.1 and start over.
After OktoPrep installation, I connected the phone to my Mac, started up iTunes, and selected the 1.1.2 upgrade and clicked the “Upgrade” button. After a long wait my iPhone was reset and iTunes confirmed that it was now running 1.1.2 firmware.
I then downloaded and unzipped the 1.1.2 jailbreak from Conceited Software’s website. I quit iTunes but kept my iPhone connected and I ran the jailbreak.jar file by double-clicking on it in the Finder. It instantly connected to my iPhone and worked its magic. I was informed that the phone would reset a few times and then it would be ready.
After a couple of resets, the phone seemed stable and functioning, so I quit the jailbreak.jar app, and ran iTunes again. It connected to the phone without any problems and synced as usual. I then launched the Installer.app on the phone, and installed the BSD Subsystem and OpenSSH. I know I’ll need them to build and install the iPhone-dev tools on my system, my ultimate goal in doing all of this.
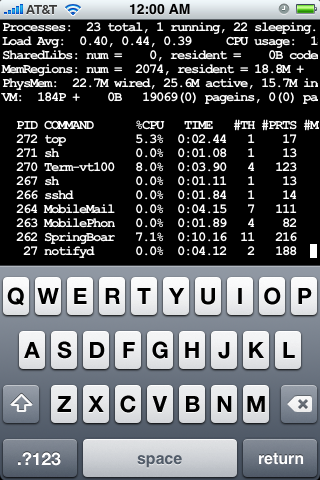
After I installed OpenSSH, I launched the Terminal.app on my Mac and typed the following to connect to my phone wirelessly over ssh.
After supplying the default SSH password for root on 1.1.2 phones, “alpine”, I was connected to my iPhone :) Here’s the Terminl.app running “top” on the iPhone.
If you’re wondering how you’d find out the IP number for your phone, just go to Settings->Wi-Fi and select the network you’re currently connected to. It will show you an info screen with the IP information.
Stay tuned for the next action: Installing the developer toolchain on a Mac and a Windows machine.